Table of Contents
How can you prevent injuries during exercise?
Common workout injuries
Despite the multitude of exercise and sporting activity, there is a similarity of how one gets hurt.
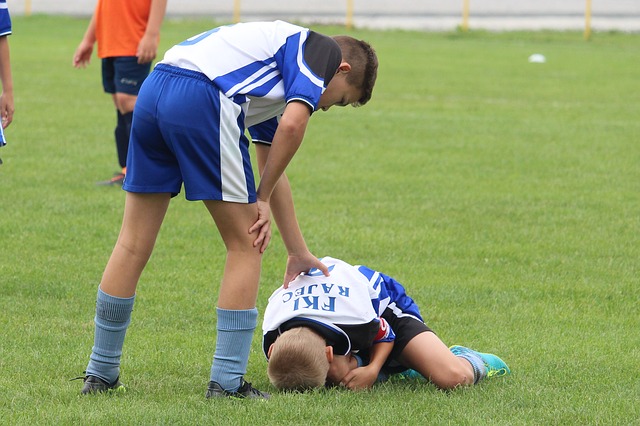
Here are the most common injuries:
Muscle pull and strain
Sprained ankle
Shoulder injury
Knee injuries
Shin splints
Tendinitis
Wrist sprain or dislocation
General Things to Look Out For
-
Muscle strain – when the muscle tendon unit is torn or stretched;
-
Tendonitis – inflammation of a tendon;
-
Muscle sprain – stretched or partially torn ligaments;
-
Bursitis – irritation or inflammation of the bursa, which is a sack filled with lubricating fluid located between tissues, such as tendons, skin, bone and muscle.
You should begin every workout with a warm up and a cool down. A warm-up will help your body get ready for the exercise you are about to commence.
Your heart rate will gradually increase, and your muscles and joints will loosen up. Try a warm up like riding a bike, jumping rope or jogging in place for 5 to 10 minutes.
When cooling clown, it is of the essence to bring your heart rate back down walk for between 5 to 10 minutes after you work out.
Following this, ensure that you do dynamic stretching, This will help you increase flexibility. It is best to stretch after you warm up and cool down.
Ensure that when you get to your exercise, you ease into it. This is especially the case when you begin a new exercise routine.
Just start slowly! Then build up the intensity, duration, and frequency.
Don’t push yourself too hard. Your fitness abilities will increase with time, allow your body to get used to a pace, and then improve your fitness abilities.
Warm up
The RAMP warm-up is the most scientifically proven warm-up to prepare your body for competition. The acronym ‘RAMP’ stands for:
-
Raise – Increase muscle temperature, core temperature, blood flow, muscle elasticity and neural activation.
-
Activate – Engage the muscles in preparation for the upcoming session
-
Mobilize – Focus on movement patterns which will be used during the game.
-
Potentiate – Gradually increasing the stress on the body in preparation for the upcoming competition/session.
Stretching
Sports are a leading cause of injury, and as such, it is essential to develop mobility to prevent injuries. Injuries can have both long and short term influences. It can put both your fun and the health benefits of playing a game on hold. Getting a stretch into your routine is always going to make your activity easier.
How often to Stretch
You should do a dynamic stretch before you train. Do this with five to ten minutes of light exercise. For example, do some light jogging or go for a walk.
Light activity will increase blood flow to the muscle and tendons. As such they will be less likely to be injured.
As an athlete you should be stretching a minimum of three times a week. But you have to do so after a warm up or work out. This is because the muscles are relaxed and loose. Stretching before warming up doesn’t necessarily reduce the risk of injury. Do a static stretch after the workout!!
When you static stretch, ensure that you hold each stretch for a minimum of 15-30 seconds. Make sure that you do not bounce or jerk for those 30 seconds.
Its also important that you do not injure yourself!
What helps with this? Do you know yourself? – if you stretch to the point of pain you are doing something wrong.
Repeat all stretches two to three times for each muscle group. This allows your whole body to release and get ready to exercise.
Keep in mind that stretching is not a game, it is not a competition. Take your time to ensure that all of your muscles are tended to.
Strength training

Strength training is fantastic for both fitness and rehabilitation. It is more efficient and more effective than most people realize. For general fitness and health these can partially replace cardio workouts, which are repetitive and time-consuming.
Be aware that you are also at risk for common repetitive strain injuries such as iliotibial band syndrome, planter fasciitis, shin splints and hamstring.
Know Where You Have Trouble
Listen to your body. If you are used to a fitness regime or work out regularly, you will naturally know what your body tells you what is right for you, and what is not. Tailor your workout areas.
If you have arthritis in your knees, you should be building up your strength in those areas first. If your exercising hurts, you are doing it wrong. Such is the case with most things in life. If you have any medical conditions, check with your doctor before you start exercising.
If you are older and haven’t exercised in quite some time, ask for advice. Book in a personal trainer to help you with your problem areas.
Let them know what joints and muscles hurt, and which ones you are able to move freely.
The no pain no gain philosophy is only going to set you up for Injury. It is possible, and a lot more beneficial for you if you get fit without feeling a heap of pain. If you feel pain, stop, You might get injured, and it is better to be safe then sorry.
Fuel Your Body
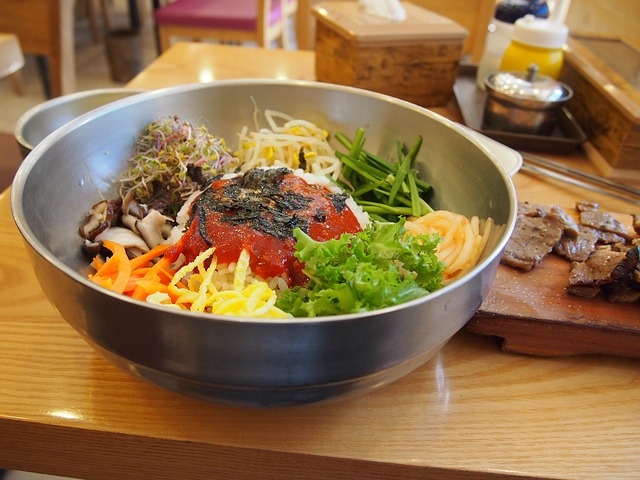
Drink plenty of water before, during and after your work out. Begin by drinking about 17 to 20 ounces of water about 2 to 3 hours before you begin your workout.
Drink 8 ounces about 20 minutes to 30 minutes before working out. Drink 8 ounces every 10 to 20 minutes during your workout. Drink 8 ounces within a half hour of when your workout is done.
Speaking of drinking water, don’t forget about food! Eat a small meal or snack every 2 to 3 hours to keep a steady source of fuel for your body. After your workout, eat a protein snack to replenish your energy stores.
Dress Right
Wear the proper gear when you work out. If you are a runner for example, wear a good pair of running shoes. This can prevent you from injuries. In the event that you are not sure of which shoes to wear, ask a professional.
When shopping for fitness clothing, let them know what your abilities are, how often you train and if you have any problems. For example some people run inwards, and others run outwards. In this case, you might need special shoes to support the problem areas.
If you have any swelling wrap it with a compression bandage or compression tape. In the event that the swelling does not go down within a few days, see a medical professional.
Rest

Never underestimate rest! Take 1 to 2 days off a week to rest. It gives your body a chance to recover between workouts. You need to build up a stamina and muscle strength. Proper sleep is essential!!
The longer and more strenuous your exercise routines are, the more time your body needs to rest. In the event that you feel pain anywhere, rest.
If you reel pain anywhere, rest. If your ankle hurts, skip jogging for a day or so and do muscle strength training. Switch one out for the other to ensure that you are not going to get injured.
Treatments
Injuries happen. No matter how good you are at workouts, and how much you stretch, sometimes injuries just happen. If you develop an injury, follow the RICE method to keep your injury from getting worse. If it does not get better with this method within a couple of weeks, seek medical aid or physiotherapy.
R stands for rest the injury. Ensure that you do not put pressure on your injure point. If you feel like it is getting inflamed, always seek help from a medical professional.
I stand for ice. The injury will lessen in the presence of ice, so put it around your wound. Swelling will reduce when you apply ice, as will bleeding and inflammation.
C stands for compression. Apply a bandage to minimize swelling. To ensure that you do not apply it with too much force. In that case, it can only get worse. It should be compressed, but it should by no means hurt, listen to your body if it aches something is wrong.
E stands for elevate. This reduces swelling. So the most significant thing with this is that you want to elevate it above your heart.
Dealing With Pain
Non steroidal and anti-inflammatory medications like ibuprofen can help ease the pain when you have injured yourself. Check with your doctor before you use any stronger medicines.
Most workout injuries will heal on their own. Wait for an approximate 2-4 weeks depending on the nature of the injury.
If the injuries have not improved in this time, it is time to seek medical care,
Wait until you are fully healed. That means waiting until you are no longer in any pain. If you want to continue working out, that’s completely fine! Just do not exert the muscle or joint that you have injured.
If you have damaged your ankle jogging, feel free to work out your arm muscles. Staying active might actually heal you quicker than being sedentary.
Once you have fully recovered from your injury — this means feeling NO PAIN far longer than a week, you can begin to work out again. Slowly but surely. Do not try to work out with the same enthusiasm as you did before you sustained your injury.
This might just put you into recovery again. Most of the time you need to rebuild your muscle strength and endurance. This usually takes about three whole weeks of regular exercise.
Preventing ankle injuries
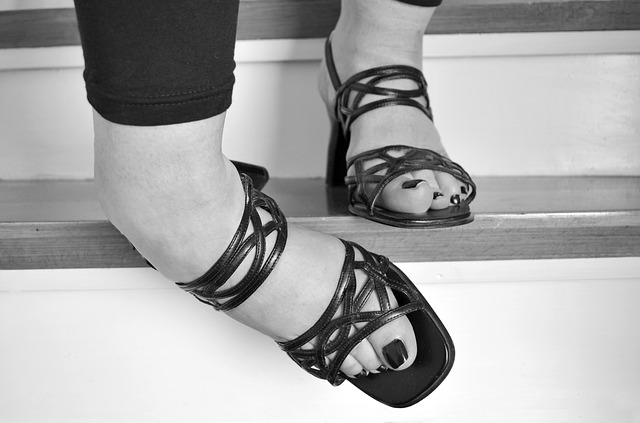
By strengthening your weak areas, you can avoid painful injuries. A pair of weak ankles can set you up for a sprain in the event that you do not strengthen them. As such you can do plantar flexion. This uses a resistance band to
enhance your arches. This will also prevent your ankles to roll inwards when walking or running.
Dorsiflexion with a resistance band can strengthen the front of your ankles preventing injuries. Lateral hops can help strengthen not just your ankles but also your entire lower body providing stability for quick lateral moves. Dorsiflexion is the action of raising the foot upwards towards the shin. It means the flexion of the foot in the dorsal, or upward, direction.
Preventing Back injuries
Focus on form. When standing, balance your weight equitably on your feet. Try not to slump. Have a great stance when sitting, pick a seat that supports your spinal bends. Change the stature of your seat with the goal that your feet lay level on the floor. Get rid of your wallet or cellphone from your back pocket when sitting to avoid putting additional weight on your rump or lower back.
Lift appropriately. When lifting and conveying an overwhelming item, lift with your legs and fix your ab muscles. Hold the article near your body. Keep up the regular bend of your back. Try not to curve while lifting. In the event that an article is too substantial, always wear a lifting belt.
Tune in to your body. In the event that you should sit for a drawn out period, change your position frequently. Occasionally stroll around and delicately stretch your muscles to ease pressure.
Preventing Knee Injuries
Knee pain is a widespread problem over the age of 25. Dead lifts can strengthen your posterior, side lying leg lifts, donkey kicks and wall squats can help you with stabilizing your knees. As such you can prevent injuries and pain.
One of the most common sports injuries of runners is iliotibial band syndrome. This occurs when the ligament running from your hip to your shin, down the outside of your thigh becomes tight and or inflamed.
The IT band that attaches your knee can become tight. Any knee can become painful as the IT bend pulls your knee out of alignment Many exercises prevent this such as cross-legged stretches, wall stretches, single leg bridge lifts, side lunches, and foam rollers.
A foam roller is an inexpensive fitness tool with many uses, spend a few minutes on it daily. It can trigger any points and increase blood flow and improve tissue quality, it does so while simultaneously engaging your muscles and building your strength at the same time.
Do your foam rolling both before your workout and after it, workout sessions should focus on problem areas whereas post workout sessions should be focusing on all of the muscle groups you have used on the present day. There are also rolling massage sticks that you can.
Preventing Hamstring Injury
Who hasn’t had tight hamstrings at one point or another? It can lead to pulled muscles and sprains. Proper stretching techniques can help you stay loose and limber, this avoids tight hamstrings and the injuries that come with it.
Studies have indicated that stretching benefits connective tissues, triggers the growth of the protein filaments inside each muscle cell.
All of this is essential to proper body movement, and it improves the performance of your spindle receptors. This protects our muscles against severe injury, stretching should be a regular part of your workout.
Active Hamstring Stretch
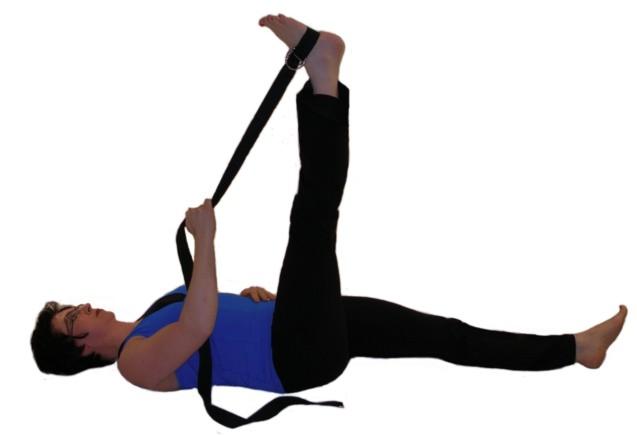
Hamstring stretches are absolutely crucial if you are performing sprints. Spring is a high-intensity exercise that does not require specific equipment.
It is of the essence that in the event you sprint, you begin doing so gradually and do so in a combination of stretching.
To prevent hamstring injury, you should perform Isolated Stretches and include:
• Hamstring I stretch in ten reps
• Hamstring II stretch foot tilted slightly in ten reps
• Hamstring III stretch foot twisted somewhat right in ten reps
• Rolling your hamstring using a foam roller
Preventing Shin Injury
Shin splints is another common issue for many. It is caused by stress fractures in your tibia, or your shin bone, as well as tired muscles, flat feet, or lax arches. Prevent this by doing basic calf raises and alternative walking on your toes followed by your heels.
To target the muscles in your lower leg, do stationery calf raises with your feet internally and externally rotated.
Other things that you can do include leg raises performed sitting in a chair, with a two to six-pound dumbbell between your feet and foam rolling your calves and shins.
In the event that you believe you have a shin splint, stop running! It will only get worse from there. Focus on strengthening exercises instead. Do so until the pain has reduced. Running on a surface that is hard contributes to shin splints. So give the pavement a rest and try running on soft surfaces. Try the beach, nature trails or even grassy areas.
Preventing Shoulder Injury
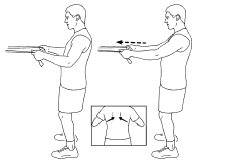
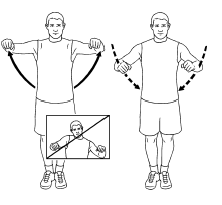
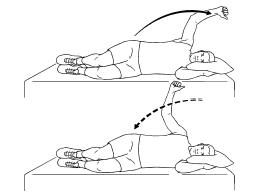
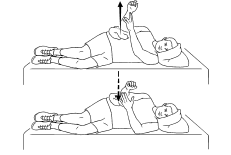
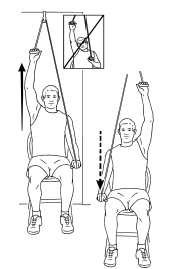
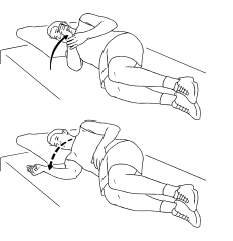
Try to do some some rotary cuff work outs. There are a few principle practices you can do to help reinforce your rotator sleeve practices and avoid damage:
1. Lie on your right side. Keep your left arm along the upper side of your body. Holding a light hand weight, twist your right elbow to 90°. Keep the right lower arm laying on the table. Presently move your right shoulder in, raising your right lower arm up to your chest. Lower the lower arm gradually. Repeat.
2. Lie on your right side with a towel under your armpit. Stretch your right arm over your head. Keep your left arm next to you with your elbow twisted to 90° and the lower arm leaning against your chest, palm down. Hold a light free weight in your left hand for tension. Lower the arm gradually. Repeat.
3. Start by lying on your stomach on a table or a bed. Put your left arm at shoulder level with your elbow bowed to 90° and your hand down. Keep your elbow twisted and gradually lift your left hand. Stop when your hand is level with your shoulder. Lower the hand gradually. Rehash the activity until your arm is fatigued. At that point do the entire exercise again with the other side.
Foundation Training
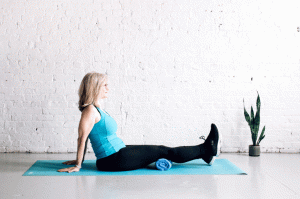
An all-around injury prevention strategy is foundation training. It is based on exercise training that optimizes posture and decreases bodily pain. As such you can reduce the number of exercise injuries you might face. Professional and Olympic athletes use this wondrous technique.
Athletic injuries usually do not need treatment, but they do need the injured to rehabilitate, or at least a chance for your body to heal. Take your recovery seriously!!!
Exercises to Prevent Injury
How can you prevent injuries during exercise?
1. Lateral Band Walk
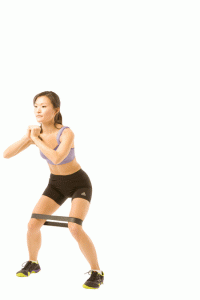
It is every trainers favorite move to strengthen your hips as it targets the abductor’s muscle. This controls the hip turnout. Strong abductors can keep the knees in proper alignment. As such it can protect them from caving in or flaring on your squats and lunges or when biking or running.
This is how you do it. Following the end of your warm up, get a mini band and wrap it around your legs above the knees. Sit into a quarter squat and take sideways steps in one direction, keeping your toes forward not quite letting them come together. Do this in sets of 10.
2. Single Leg Glute Bridge
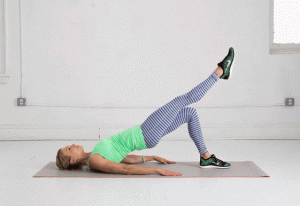
Bridges and thrusts activate the posterior chain, meaning our back muscles, also trains the hips to knees tracking safely straight ahead.
Start with your back on a mat. Keep your arms on your sides. Slowly bend your knees and plant your foot as close to your butt as you can. Straighten the other leg. Press firmly into your foot and clench your butt to press your hips into the ceiling.
Hold for up to five seconds before lowering and repeating. Do this in sets of ten. Elevating your shoulders on a bench gets you a great range of motion to reduce and raise your hip. Add weight with dumbbells on the waist.
3. Reverse Hypers
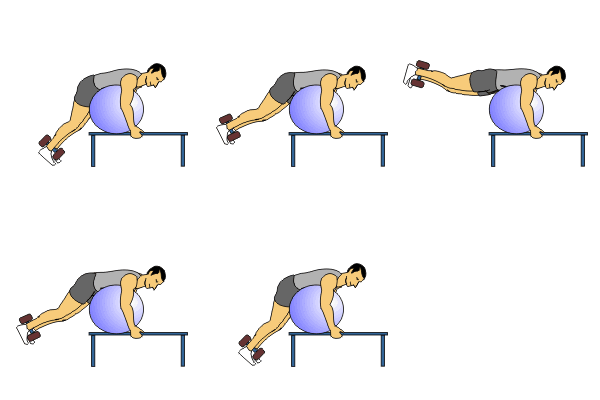
This exercise helps the butt and the back. Lie face down on a bench. Allow upper body support, your hip is aligned along the seats back edge. Flex your toes and firm your legs.
Following this, squeeze your butt to raise them together as a unit, so they’re in line with your torso. Squeeze and hold for about 5 seconds and release.. but don’t let your feet come to the floor entirely. Do this ten times.
4.Forearm Plank
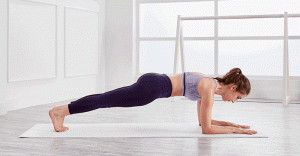
Your front and side forearms should serve as planks. As such, this is great for core integration that you need. This is essential for every move you make. But you should ensure that you are doing it in the right way.
Place your forearms on the floor and ensure that your elbows are right under your shoulders. Then, extend one straight leg back, kickstand the foot and sending the other leg to meet it Look at the point between your hands en press your arms into the floor. Squeeze it.
Do the same in a side plank. When on your side, bend your knees slightly before you come up onto the blade of your foot.
5. Bulgarian Split Squat
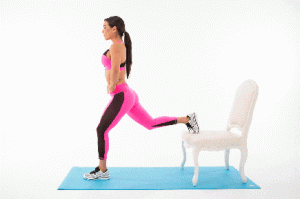
This is a single leg squat. Work unilaterally to strength imbalance, by raising and supporting the rear you can encourage 90-degree motion in the front leg. It’s a balance challenge without being crazily complicated, but it also strengthens you.
Before you add weight, stand up in front of a bench. Rest the toes of your back foot on the ground. Square those hips of yours and angle your torso forward. Bend both of your legs and focus on the front so that its knee comes to a 90-degree level. Your body should lower vertically. Press into your front foot, weight in the heel and come back up.
6. Single Leg Dead lift
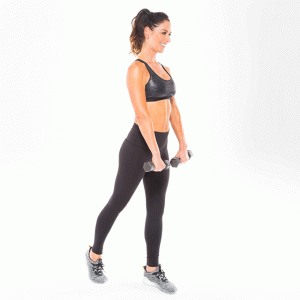
This is focused on motivating the hamstrings and glutes, one side at a time, You can use a dumbbell if you wish.
Even without a dumbbell in your hand, its a difficult practice. Stand with your feet hip-width and shift your weight onto one foot. Focus on sending the butt back by hinging at the hips and keeping them square. Do so with the rear leg coming along for the ride.
Keep a soft standing knee. Only go as far into the hinge as you can and keep your rear leg in alignment with hips, shoulders and head. Squeeze the gluts of your standing leg to bring yourself back to stand.
7. Plank Alternating Leg Lift
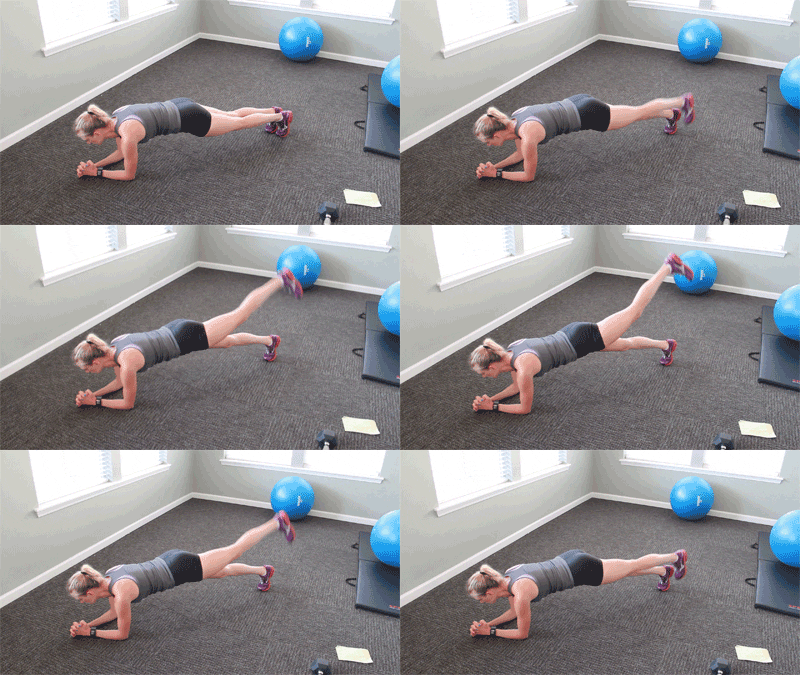
Planks train core muscles for synergy in a still position. Come to all fours and keep your hands under shoulders knees and hips. Extend opposite hand and foot straight out from the body.
Do so keeping your shoulders and hips square to the floor and reaching fingertips forward. Hold for a second and bring the limbs back in, elbow towards knee and do this 15 to 20 reps before switching.
8. Walking Lunge

Many lower body lifts can keep your feet firmly planted on the floor. Walking lunges can challenge your strength differently. Before you grab the dumbbells, start with your feet hip width apart. Step forward into a lunge, bend both knees to a 90-degree angle and lean the torso forward.
Do this slightly so that your weight is pushed forward. Push that foot into the ground and pull your body ahead. Travel at the very least 10 paces down the floor. When adding weight ensures that you keep the torso leaned but not collapsed over your front leg. Head up!
9. Stability Ball Chest Fly
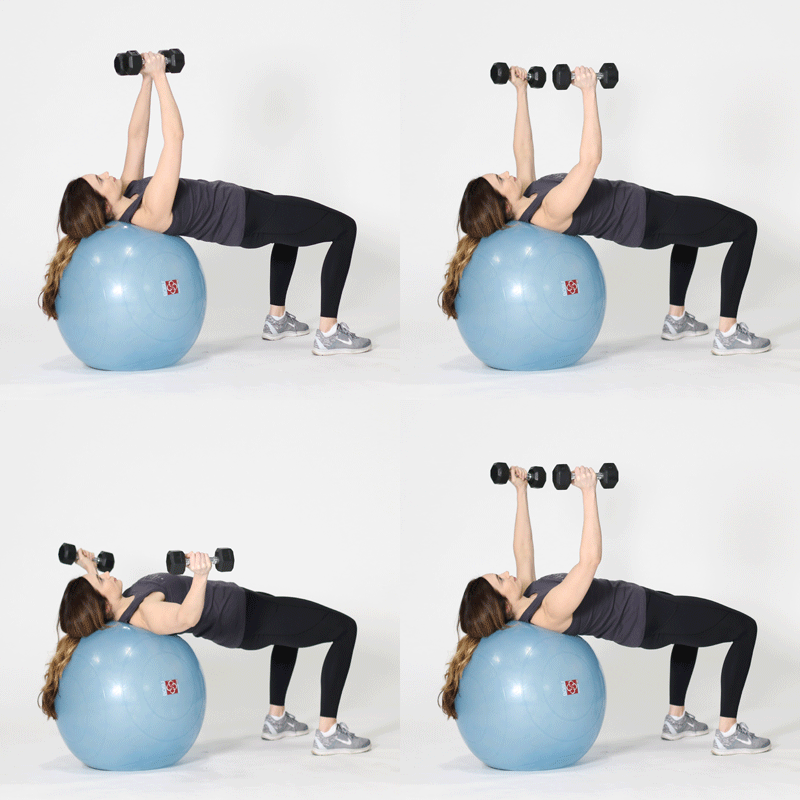
Holding a couple of hand weights, place your shoulders and head on an activity ball, your feet on the floor and knees bend at a 90-degree edge with the goal that your body makes a tabletop shape. Raise the hand weights together straight over your chest, palms in, at that point gradually bring down the arms out to your sides with elbows slightly, bent until your elbows are at chest level. Utilizing your chest muscles, unite your hands back up and raise the free weights again.
10. Dumbbell Row

Grab one dumbbell in one hand, kneel on a bench while still keeping your back straight and head up. Hold the dumbbell out straight in front of you with arm straight. Then, pull towards your body. Brings the arm back down and repeat. Do this with a few sets changing arms.
Spoga Premium 5/8-Inch Extra Thick 71-Inch Long High Density Exercise Yoga Mat with Comfort Foam and Carrying Straps
71" long 24" wide yoga mat ensures comfort for people of all shapes and sizes
Ultra thick mat with specially designed Spoga memory foam protects your knees and joints, absorbs impact, and provides amazing comfort while still allowing you to grip the floor for balance
Includes a self-strapping System featuring two elastic straps connected by a handle, offering an effective System for keeping the mat neatly rolled up and easy Transport and storage
Price: $48.36
REEHUT Foam Roller, High Density Muscle Roller, Trigger Point Massage for Physical Therapy & Exercise, with Free…
Outer foam measuring 13" x 5.5" and inner foam measuring 13" x 3.8".
100% EVA material (outlasts ALL cheap quality foam rollers).
Lightweight and portable, comes with a FREE CARRY CASE for easily taking and storing.
Price: $30.99
Resistance Loop Band Full Set of 5 Levels – BlueSky 001 Professional-Grade Fitness Bands for Yoga, Pilates, Dance…
BlueSky 001 is proud of providing the quality loop bands since December 2015. We are alway standing here for our customers. All bands are 12 inch long by 2 inch wide (30 cm by 5 cm). The longer bands provide more options while they are still a good fit for most exercises and workouts. Please notice that the length is 12 inch other than 10 inch.
5 Levels set contains a range of resistance bands from 6lbs to 50lbs. Combined multiple bands even provide much more options! Full 5-L Band Set: Green (Tention 6-16lbs), Blue (11-27lbs), Yellow (15-33lbs), Red (21-45lbs), Black (25-50lbs)
100% eco-friendly latex. The quality and durable bands can increase your flexibility and strength - get your shoulders, hip, arms and legs toned fast without adding bulk and with minimal effort. Perform better using this exercise bands for arms workouts and legs training. Can also be used as a booty ankle or hip tension bands workout or x-training.
Price: $16.99
